Thursday, October 18, 2012
Thursday, October 11, 2012
Experiment 12: CD&DVD DIFFRACTION
10/11/2012
The purpose of the experiment is that the grooves on the CD and DVD. And compare to the manufacturer's standard value.
Equipment for the experiment: Laser, CD & DVD, a paper with a small central hole, meter stick.
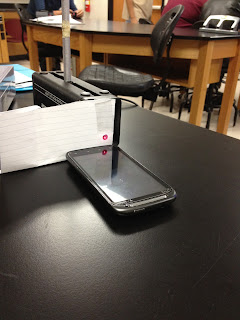
First, we placed the paper with a hole by two wood. Make sure the laser go through the hole and then place the CD and DVD on the other side. Try your best to make the CD and DVD perpendicular to the laser and measure the distance between CD, DVD and the paper.
Try to make the all dots show on the paper.
The first one is for CD and the second one is for DVD. Because the distance between the grooves are different and we want to make it easy to measure the two bright dot we place DVD much closer to paper. Then we use pen mark it down. And use rule to measure the distance.
Then, we use the equation from the class which showing below.
The CD grooves distance we got is 1590nm which is closed to 1600nm. And the DVD we got is 743nm. And to explain the equation, because this is the first order maxima, so m=1. Then d=a.We follow the equation sin(theta)=lumda/d theta is angle which the dot is bright. but d=a so we can use this equation to find a. And this is exactly a triangle. So use the geometry to solve for a which we got is 1590nm for CD and 743nm for DVD. So this experiment we got almost correct measurement. And we learn how difference the distance between CD and DVD, because DVD can storage more information, so the distance should be closer so that can storage more. And base on the technology,that's why CD is cheaper than DVD.
Tuesday, October 9, 2012
Experiment 11: Measuring a human hair
10/9/2012
In this experiment, we used two different methods to measure the thickness of a hair. Accurately measuring the thickness of a human hair can appear to be a difficult undertaking. However, with the aid of a laser or a a micrometer, we find that obtaining this measurement is not as difficult as we may thought.
First, we using a note card and make a clean hole. Then tape a hair across the hole in the card so that the hair is taut. Clamp the card so that it is parallel to the white board. Mount the laser so that it points perpendicularly toward the wall through the hole in the card. Note the wavelength of the light that the laser emits. Measure the distance from the card to the whiteboard.
We try to tape the hair in the middle of the hole.We use a cell phone to hold the card so that it cant move.
We measure the distance from the white board to the laser which is 147.3cm+/-0.1cm
As you can see, it is existing interference on the white board.
Then use a marker to make points. We made the minima points.
Then we collected all datas and find the d.
Follow the equation, d=lumda*L/Y which d we got is 0.11mm+/-0.03. And we measured by micrometer is 0.08mm+/-0.01mm. It is still existing a big errors.
In conclusion, we learned how to use the micrometer to measure and the equation y=lumda*l/d is alright. And we find that when the white board go further. The imagine is turning ambiguous, but if we put the white board too close to the laser, it is hard to measure the distance between the minima.
Thursday, October 4, 2012
Experiment 10: Lense
10/4/2012
In this Exploration we observe some other characteristics of a converging lens when the object is placed on one side of the lens and the real, inverted image is placed on the other side of the lens.Also, we develop a mathematical relationship between the object distance and the image distance.
The equipment we need: lamp, converging lens, lens holder, paper, meter and meter stick.
First, we measured the focal length under the sun. When the image on the ground is a bright dot, then measure the distance from the dot to the middle of lens by ruler. f=4.5+/-0.2cm
Then we set up the equipment.Measure the height of the object.
And make the object distance to 1.5f, 2f, 3f, 4f, 5f. The place a paper on the other side so that can get a clear image. Then measure the image height. And the object distance and image distance.
Of course, we also reserve the lens in the same object distance. But we got the same image distance. And we also cover the top half of the lens by a paper. It is dimmer as you can see.
Then collect all data and make a form.
Change the object distance to 0.5f There is no image on the paper but we look through the lens at the object to view the image. The image is virtual and repeating.
Set up a graph for those datas.
The y-axis is inverse image distance and the x-axis is negative inverse object distance.The slope is 1.0233 and the y-intercept is 0.218
The y-intercept should be the image distance when x close to zero which means object distance is infinity. The inverse of y-intercept is the focal length of lens which is 4.587. It is closer to what we measured.(4.5+/-0.2) 1/di=1/do(1.0233)+0.2180
Subscribe to:
Comments (Atom)


